
A completed and delicious maibock is best enjoyed in the great outdoors (or your backyard)
Brew Day is the best day of the week. With maybe the exception of the day you unseal and pour the first bottle of a new batch of beer. The very best day would be if these two days fell on the same day, but lets not get crazy.
Earlier I posted on how to bottle beer, which is only useful knowledge only if you have a nice batch of beer waiting to be bottled. So today’s post will be all about brew day and the steps to making your beer. If beer making seems complicated don’t despair. Allegedly if you can make tea you can make beer and (according to Craft Beer Talk) you’re pretty dim if you screw it up. As someone who has messed up 2 batches of beer, I am not an expert. But I’m not all that dim and I’ve learned from my mistakes. Hopefully that means I can help others avoid similar mistakes.
Earlier I posted on how to bottle beer, which is only useful knowledge only if you have a nice batch of beer waiting to be bottled. So today’s post will be all about brew day and the steps to making your beer. If beer making seems complicated don’t despair. Allegedly if you can make tea you can make beer and (according to Craft Beer Talk) you’re pretty dim if you screw it up. As someone who has messed up 2 batches of beer, I am not an expert. But I’m not all that dim and I’ve learned from my mistakes. Hopefully that means I can help others avoid similar mistakes.
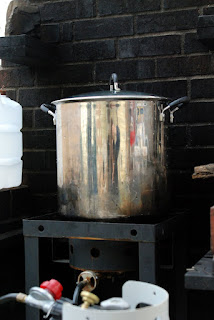
Get used to this view, you'll be seeing it for quite awhile on brew day
Step One: Assemble your Ingredients and Tools
This is important to make sure you have everything you need and don’t freak out halfway through the boil realizing that you don’t know what happened to the hops, or that your smack pack hasn’t been smacked yet, or the cauldron stir stick has been used to trellis the beans. While assembling your tools it’s important to sanitize everything. While you may be boiling the wort (pre-beer) and killing off bad guys in that situation, you don’t want to be sticking other contaminated things in your clean beer and leaving that to ferment for a few weeks. Though, don’t be a spaz about it, otherwise brew day looses it’s glory. Be sure to get a beer kit, or have some nice person at a brew supply store help you assemble a clone recipe.
Step Two: Start Boiling
Many kits and recipes have you start of by not-just-yet-boiling some specialty grains. This is usually your malted barley, wheat, roasted barley, oats and what have you. This is basically like making tea, warm up your water to between 150 - 170 degrees. Pour the specialty grains into the grain bag, tie a loose knot at the top and steep for 20-30 minutes. Quality of water is important here, we get two 2.5 gallon jugs from the grocery. Don’t use hose water, tap water or rain water. Next, bring your wort up to a boil now and while that’s working, take out the grain bag and let it just drip into the pot. Your grains are spent and you can feed that stuff to your horse, chickens or compost pile.

Specialty grain sack draining into the pot
Step Three: Hops, Malt and a Cold One
Depending on what kind of beer your making, you may need to add some hops at this point. Once the wort is good and boiling, add your liquid or dried malt extract (if you’re not awesome and have the capabilities to make an all-grain beer). Use your giant cauldron stick and stir in that goodness. Careful to not boil over, adjust your heat as necessary. Generally you’ll have to boil for about an hour, so this is the best time to, as my book tells me, “relax, don’t worry, and have a home brew.” If this is your first home brew, I recommend relaxing with a local craft brew. Keep an eye on your time if you need to add more hops, and give the wort a stir now and again.

Adding liquid malt extract to the mix
Step Four: Be Cool, Add Yeast, and Lock
Once you’re done boiling and all the grains, malts and hops are added to your wort, it’s time to cool it down and transfer to the sanitized primary fermentor. You can be super fancy get get a wort chiller. Or you can be like us and pull jugs of water from the freezer (did you remember to put those in before boiling?) and pour the cold water into the fermentor. Add your wort by siphoning, pouring, or using a funnel with a screen, just avoid adding the gunk at the bottom. Once the carboy isn’t warm to the touch (about 80 degrees) add the yeast. Stir it all up and seal with the airlock, we use vodka (or whiskey if we’re out of vodka). Keep the carboy in a cool dark place.
The hardest part is the waiting! But your beer will make it all worthwhile when it starts to bubble and foam. That’s the yeast working by eating all the sugars from the malt extract and grains. Those bubbles are helping make alcohol and are turning wort into beer. I can spend an embarrassing amount of time watching the beer bubble.

Transferring from a primary to a secondary is an activity best completed under observation
If you only need to do a primary fermentation, then you’re in luck! After a couple weeks (or longer if you’re patient) then you can bottle, which is awesome. Otherwise, get out your sanitizing gear again and clean out a secondary fermentor and siphon. Transfer beer from one fermentor to the other and you’ll have lovely clearer beer in a few weeks. While you’re waiting, if you don’t have a store of bottles built up, keep drinking! Or get some friends to donate brown, pop-top bottles to you.
Cheers!
No comments:
Post a Comment