Showing posts with label beer. Show all posts
Showing posts with label beer. Show all posts
Friday, May 6, 2011
Brewing is not Just for Men!
Sorry for the slow posts this week. Here's an short video from Minnesota Public Radio about the increasing number of women home brewing. Since I'm a woman and I home brew I'm pretty excited about more women getting into brewing, and for that matter, drinking beer. Here's to the ladies!
Monday, April 25, 2011
A Great Day is Brew Day

A completed and delicious maibock is best enjoyed in the great outdoors (or your backyard)
Brew Day is the best day of the week. With maybe the exception of the day you unseal and pour the first bottle of a new batch of beer. The very best day would be if these two days fell on the same day, but lets not get crazy.
Earlier I posted on how to bottle beer, which is only useful knowledge only if you have a nice batch of beer waiting to be bottled. So today’s post will be all about brew day and the steps to making your beer. If beer making seems complicated don’t despair. Allegedly if you can make tea you can make beer and (according to Craft Beer Talk) you’re pretty dim if you screw it up. As someone who has messed up 2 batches of beer, I am not an expert. But I’m not all that dim and I’ve learned from my mistakes. Hopefully that means I can help others avoid similar mistakes.
Earlier I posted on how to bottle beer, which is only useful knowledge only if you have a nice batch of beer waiting to be bottled. So today’s post will be all about brew day and the steps to making your beer. If beer making seems complicated don’t despair. Allegedly if you can make tea you can make beer and (according to Craft Beer Talk) you’re pretty dim if you screw it up. As someone who has messed up 2 batches of beer, I am not an expert. But I’m not all that dim and I’ve learned from my mistakes. Hopefully that means I can help others avoid similar mistakes.
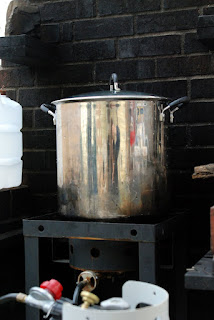
Get used to this view, you'll be seeing it for quite awhile on brew day
Step One: Assemble your Ingredients and Tools
This is important to make sure you have everything you need and don’t freak out halfway through the boil realizing that you don’t know what happened to the hops, or that your smack pack hasn’t been smacked yet, or the cauldron stir stick has been used to trellis the beans. While assembling your tools it’s important to sanitize everything. While you may be boiling the wort (pre-beer) and killing off bad guys in that situation, you don’t want to be sticking other contaminated things in your clean beer and leaving that to ferment for a few weeks. Though, don’t be a spaz about it, otherwise brew day looses it’s glory. Be sure to get a beer kit, or have some nice person at a brew supply store help you assemble a clone recipe.
Step Two: Start Boiling
Many kits and recipes have you start of by not-just-yet-boiling some specialty grains. This is usually your malted barley, wheat, roasted barley, oats and what have you. This is basically like making tea, warm up your water to between 150 - 170 degrees. Pour the specialty grains into the grain bag, tie a loose knot at the top and steep for 20-30 minutes. Quality of water is important here, we get two 2.5 gallon jugs from the grocery. Don’t use hose water, tap water or rain water. Next, bring your wort up to a boil now and while that’s working, take out the grain bag and let it just drip into the pot. Your grains are spent and you can feed that stuff to your horse, chickens or compost pile.

Specialty grain sack draining into the pot
Step Three: Hops, Malt and a Cold One
Depending on what kind of beer your making, you may need to add some hops at this point. Once the wort is good and boiling, add your liquid or dried malt extract (if you’re not awesome and have the capabilities to make an all-grain beer). Use your giant cauldron stick and stir in that goodness. Careful to not boil over, adjust your heat as necessary. Generally you’ll have to boil for about an hour, so this is the best time to, as my book tells me, “relax, don’t worry, and have a home brew.” If this is your first home brew, I recommend relaxing with a local craft brew. Keep an eye on your time if you need to add more hops, and give the wort a stir now and again.

Adding liquid malt extract to the mix
Step Four: Be Cool, Add Yeast, and Lock
Once you’re done boiling and all the grains, malts and hops are added to your wort, it’s time to cool it down and transfer to the sanitized primary fermentor. You can be super fancy get get a wort chiller. Or you can be like us and pull jugs of water from the freezer (did you remember to put those in before boiling?) and pour the cold water into the fermentor. Add your wort by siphoning, pouring, or using a funnel with a screen, just avoid adding the gunk at the bottom. Once the carboy isn’t warm to the touch (about 80 degrees) add the yeast. Stir it all up and seal with the airlock, we use vodka (or whiskey if we’re out of vodka). Keep the carboy in a cool dark place.
The hardest part is the waiting! But your beer will make it all worthwhile when it starts to bubble and foam. That’s the yeast working by eating all the sugars from the malt extract and grains. Those bubbles are helping make alcohol and are turning wort into beer. I can spend an embarrassing amount of time watching the beer bubble.

Transferring from a primary to a secondary is an activity best completed under observation
If you only need to do a primary fermentation, then you’re in luck! After a couple weeks (or longer if you’re patient) then you can bottle, which is awesome. Otherwise, get out your sanitizing gear again and clean out a secondary fermentor and siphon. Transfer beer from one fermentor to the other and you’ll have lovely clearer beer in a few weeks. While you’re waiting, if you don’t have a store of bottles built up, keep drinking! Or get some friends to donate brown, pop-top bottles to you.
Cheers!
Tuesday, March 1, 2011
Muffin Madness: Chocolate Chocolate Chip Porter Muffins

March is a month of madness; basketball, the weather... perhaps the Middle East. And because I love muffins... now Muffin Madness. Muffins are delicious and versatile. They can be sweet or savory. Completely decadent or delightfully healthy. I love making muffins, and I improvise on recipes from my favorite muffin book (500 Best Muffin Recipes by Esther Brody) frequently. Since I make a lot of muffins it is high time I create my own recipes.
Hence... Muffin Madness. March will be a month of muffin challenge. Each week I will make 2 batches of muffins, a sweet and a savory. The recipes will be of my own creation and Andy will be the official taste tester. I will share my recipes here with you, and if anyone makes a batch, I would love to hear about it!
First challenge, Chocolate Chocolate Chip Porter Muffins.

The only way to realize how many ingredients are in a recipe is to assemble them in one place.
Ever since a coworker brought porter brownies in to work, I’ve been itching to make chocolate beer muffins. I’ve made beer bread before and one batch of beer and cheese muffins, but I’ve never used a dark beer. The thought of the complex, malty beer flavor mixed with melted chocolate was too much for me to resist and I needed to make these first.

Mixed batter ready to be sampled and divided into muffin tins.
These couldn’t be just any old beer muffins, they needed to be decadent and super chocolaty. I’m a chocolate fiend, so I wanted chocolate in every part of the muffin. The dry ingredients get cocoa powder, the wet ingredients get melted bittersweet, stir in some chocolate chips to top it off and now we’re talking.

Why waste space with a dedicated double boiler? Make your own!
Some notes on the recipe: If you don’t have a double boiler it’s OK, I don’t either! Improvise with a small bowl and a sauce pan. Let the chocolate slowly melt on low heat while you mix up the dry ingredients, just keep an eye on the stove and keep stirring. I’m known for using every bowl, surface and cooling rack in the kitchen, so I was extra proud when I realized I could melt the butter with the chocolate and combine all the wet ingredients in the cooled-down chocolate bowl. It’s always better to have fewer dishes to clean. This batch makes about 14 ½ muffins, depending on how generous you are.

Official Taster Opinion:
Andy says, “These muffins have the most complex flavor profile I have ever tasted in a muffin. Muffins are usually just sugar flavor and nothing else. “
Ingredients:
2 squares unsweetened chocolate
⅔ cup brown sugar
¼ cup milk
¼ cup butter
2 eggs
1 tsp vanilla
1 tbs vinegar
1 cup porter beer
1 ¾ cup flour
2 tbs cocoa powder
1 tsp baking soda
½ tsp salt
¾ cup chocolate chips, and extra to sprinkle on top
- In a double boiler combine unsweetened chocolate, brown sugar and milk. Stir and slowly melt chocolate. Add butter and melt. Take off heat.
- While chocolate melts; in a large bowl, whisk together flour, cocoa powder, baking soda and salt. Make a well in the center.
- Once chocolate and butter is combined, add eggs one at a time, whisking thoroughly. Stir in vanilla, vinegar and beer. Pour chocolate mixture into flour, add chocolate chips and combine. Stir carefully and mix thoroughly.
- Pour into a well greased muffin tin and bake for 15-20 minutes in a 350 degree oven.
Sunday, January 30, 2011
Almost Beer

I'm pretty sure the only reason my husband and I have friends in Tennessee is because we brew beer. So if you're lonely and looking for a friend. Learn how to brew beer, and you'll have more people "stopping by" to see "how you're doing" than you're prepared for. At any rate, I enjoy having people enjoy my beer, some folks even bring their own homebrew to swap! It's a great cycle.

Be sure to have plenty of empties on hand.
This is going to be bass-akwards I know, but my first post about the beer brewing process is going to be bottling. This makes sense for two reasons. One, bottling is the part of the process we are currently in. Two, it's my favorite part of the process. Ask any one who has ever brewed beer and they'll let you know it's about 5 hours active work and 3+ weeks passive work. Just like growing red peppers, beer brewing is an acceptable activity for the lazy.

Did you let your "almost beer" sit around in a carboy for two weeks or more without doing a thing to it?
Good job! It's ready to be bottled.
Our previous six batches of beer only needed primary fermentation. This time around we did a second fermentation and it cleared the beer up a whole lot. So when this batch was transfered to the bottling bucket there was less leftover yeast-sludge and settled junk (yum! beer!). We'll see what this means for sediment in the bottles (probably a lot less rinsing and scrubbing for the next batch). In anticipation of secondary fermentation being great we purchased another glass carboy so we don't have to worry about plastic buckets. Not that I've found anything wrong with them, I just feel safer with glass.
Bottling is pretty awesome. "Why?" you say, "Sounds like it's kind of boring, I'd rather be drinking beer than bottling it." To that I say, "Sounds like you don't like to have fun." The best part of bottling isn't necessarily filling bottles with beer, but capping bottles! Unfortunately Andy and I act as a "team" so we switch off duties and I can only spend half the time crimping caps onto bottles.

This contraption is my favorite tool. Ever.
To bottle you must first add the priming sugar to the batch. Don't forget this step or you will have to pour all your bottled beer back into the bucket and start over. This is considered un-fun. Priming sugar is just sugar that the yeast you added weeks ago will eat up and get gassy. Instead of releasing the gas into the airlock and out of the carboy; When you bottle, the gas is trapped, and forms carbonation.

If you think bottling beer would be tricky because pouring from the carboy is probably difficult, I introduce you to... the hose! I believe in my 7th grade science class we learned about siphoning.
Beer making: Putting grade school skills to good use.
Next, run a hose from the bottling bucket down to your bottling station (gravity helps here). Attach your nifty wand thing that came with your beer-making kit that lets beer run through when you push the bottom in. And then siphon your beer into the wand-thing and fill 'er up! Then you pass the bottles to me and I cap, using caps that we have simmering in hot water.

Un-capped bottle caps. Hanging out, waiting to fulfill their ultimate purpose.
This latest batch of beer comes courtesy of my nephew and niece, Colin and Emily, you don't have to be 21 to buy beer making supplies! We cracked open the Irish Draught first and will be posting soon about the results. After our move in a few weeks, we'll start on another batch and I will post on the brewing process.
Subscribe to:
Posts (Atom)